In this article, we’re diving into the fascinating world of fine-tuning machine learning models using Kohya. Fine-tuning involves taking a pre-trained model and tweaking it to perform specific tasks or improve its performance on a particular dataset.
Unlike training a model from scratch, which demands thousands of images, fine-tuning lets us generate new styles or images with just a few examples. Today, we’ll walk through the process of fine-tuning a model to create a Low-Rank Adaptation (LoRA) model for use within Stable Diffusion.
Understanding LoRA Models
LoRA, or Low-Rank Adaptation, is a nifty technique for fine-tuning Stable Diffusion models. Other methods like textual inversion, hyperlinks, and Dreambooth can be computationally heavy and might not always yield the best results. LoRA models, on the other hand, are lightweight and still deliver excellent image quality.
Rather than fine-tuning the entire model, LoRA focuses on the cross-attention layers, reducing the number of trainable parameters and the GPU memory required. However, LoRA models need to be used with a base model, like SD v1-5 or AnyLoRA, available on platforms like CivitAI or Hugging Face.
Steps to Fine-Tune a Model
To fine-tune a model on a specific object, subject, or style—let’s call it “Pippo”—follow these steps:
1. Download and Initialize Kohya
First, download Kohya from its GitHub repository. Create a folder on your machine for the project, navigate to it using the terminal, and clone the repository:
bash
cd training

git clone git@github.com:bmaltais/kohya_ss.git
Navigate into the kohya_ss directory and run the setup script:
bash
cd kohya_ss

.\setup.bat
Follow the terminal instructions to complete the setup. Choose the appropriate installation option based on your preferred PyTorch version.
2. Preprocess Images for Training
Gather images representing the object, subject, or style you want to fine-tune. For objects or subjects, 5-20 high-quality images are usually enough, while styles might require around 100 images. Ensure all images have the same file extension and consider creating captions for each image to enhance training accuracy. Tools like BLIP, GIT, or WD14 captioning, available under Kohya’s Utilities tab, can automate this process.
Optionally, use regularization images to prevent overfitting. These images should represent the general class of your training images. Generate them using tools like automatic1111’s “Generate forever” feature.
3. Configure Key Parameters
Understanding neural network fundamentals is crucial for configuring key parameters like batch size, epochs, iterations, and learning rate. Here’s a brief overview:
- Batch Size: This determines how many images are processed at once. Finding the right balance is key for efficient learning without overwhelming the network.
- Epoch: This is the number of times the model is trained on the entire dataset. More epochs generally lead to better training.
- Learning Rate: This controls the step size during optimization. The right learning rate is essential to avoid overshooting or slow learning.
- Optimizer: Algorithms like Adam or AdamW are effective for minimizing the loss function.
- Mixed Precision: This can speed up training and reduce memory usage by employing lower-precision data types like float16.
- Max Resolution: This sets the maximum resolution for training images, ensuring consistency.
4. Run the Training
Source Model: In the “Dreambooth LoRA > Source Model” tab, select the model you want to fine-tune. Enter the path to your pretrained model. Default models include Stable Diffusion v1-5.
Tools: In the “Dreambooth LoRA > Tools” tab, define your trigger word (activation prompt) and specify the paths for training images, regularization images, and output directories. Click “Prepare training data” and then “Copy info to Folder Tab” to auto-fill the necessary fields.
Captioning: Captioning your images is crucial. Use Kohya’s captioning tools for large datasets or manually caption smaller sets. The caption should include words you want to vary during image generation.
Training Parameters: In the “Dreambooth LoRA > Training Parameters” tab, adjust batch size, epoch count, learning rate, and other settings. Once everything is set, press the “Train Model” button to start the training process.
Detailed Steps and Best Practices
Download and Initialize Kohya
Start by downloading Kohya from its GitHub repository. Create a folder on your computer—let’s call it “training.” Use the terminal to navigate to this folder and clone the repository:
bash
cd training

git clone git@github.com:bmaltais/kohya_ss.git
After cloning the repository, navigate into the kohya_ss folder and run the setup script:
bash
cd kohya_ss

.\setup.bat
You’ll see a setup menu with several options:
markdown
0. Cleanup the venv

1. Install kohya_ss gui [torch 1]
2. Install kohya_ss gui [torch 2]
3. Start GUI in browser

4. Quit
For first-time installation, select option 1 or 2 depending on your preferred PyTorch version. To initialize Kohya, you can either re-run the setup.bat file and choose option 3 or directly run the gui.bat file.
Preprocessing Images for Model Training
Training Images: Gather a set of images representing the object, subject, or style you want to fine-tune. For objects or subjects, 5-20 high-quality images are typically sufficient. For styles, you might need around 100 images. It’s better to have fewer high-quality images than many low-quality ones. Ensure all images have the same file extension (e.g., png, jpeg, jpg). The image dimensions can vary, but consistent file formats are essential.
Captions can significantly enhance training accuracy. Each image should ideally have a caption—a text file describing the image’s content. This can be done manually, but for large datasets, using captioning tools like BLIP, GIT, or WD14 (available under Kohya’s Utilities tab) can save time.
Regularization Images: While optional, regularization images can help prevent the model from overfitting. These images should represent the class chosen for your training. For example, if training on a person’s face, regularization images should include faces of similar people. You can generate these images in a loop using automatic1111: right-click the “Generate” button and select “Generate forever” to automate the process.
The number of regularization images required can be calculated based on the number of training images and the repeat value, which will be discussed in the next section:
shell
# regularization_images = # training images * repeat valueor
shell
# regularization_images = # training images * repeat value * 2Configuring Key Parameters
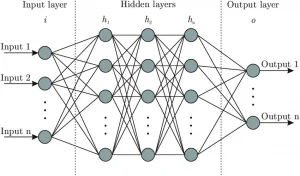
Neural Network Basics: A neural network is a system inspired by the human brain, consisting of layers of connected nodes (neurons) that process data. Training a neural network involves feeding it batches of data and adjusting its parameters based on the errors it makes, a process known as backpropagation. The goal is to minimize the difference between the network’s predictions and actual outcomes, achieved by optimizing the loss function.
Batch Size: Determines how many images are processed at once. Smaller batch sizes can help the model learn better by providing more frequent updates, but they may require more training iterations.
Epoch: Refers to one complete pass through the entire training dataset. More epochs generally mean better training, as the model gets more opportunities to learn from the data.
Learning Rate: Controls the step size during optimization. A high learning rate can speed up training but may cause the model to overshoot the optimal solution. A low learning rate leads to slower but more precise training.
Optimizer: Algorithms like Adam or AdamW are used to minimize the loss function effectively. AdamW8bit is faster and saves memory but is less precise than AdamW.
Mixed Precision: Using mixed precision can speed up training and reduce memory usage by employing lower-precision data types like float16.
Max Resolution: Sets the maximum resolution for training images, ensuring consistency during training.
Run the Training
Source Model: In the “Dreambooth LoRA > Source Model” tab, choose the model you want to fine-tune. Enter the path to your pretrained model. Default models include Stable Diffusion v1-5.
Tools: In the “Dreambooth LoRA > Tools” tab, define your trigger word (activation prompt) and specify the paths for training images, regularization images, and output directories. Click “Prepare training data” and then “Copy info to Folder Tab” to auto-fill the necessary fields.
Captioning: Captioning your images is crucial. Use Kohya’s captioning tools for large datasets or manually caption smaller sets. The caption should include words you want to vary during image generation.
Training Parameters: In the “Dreambooth LoRA > Training Parameters” tab, adjust batch size, epoch count, learning rate, and other settings. Once everything is set, press the “Train Model” button to start the training process.
Conclusion
By following these steps, you can fine-tune a model to create stunning and customized outputs using Kohya. Whether you’re generating images or exploring new styles, fine-tuning with LoRA offers a powerful and efficient method for enhancing your creative projects. Enjoy